


How to create a Bas Relief effect with Stencils....
- Tracy Sayers Trombetta
- Apr 20, 2021
- 4 min read

Updated: May 27, 2021
Have you heard of Bas Relief? I'm fascinated with it ..... My Texture Inspiration Pinterest Board has been growing with Bas Relief pieces for a couple of years now.....
What is bas-relief?
Pronounced bah-relief, the term originally stems from the Italian phrase basso-relievo which directly translates to low relief. Artists create a bas-relief by sculpting onto a 2D plane to create and accentuate figures and objects, producing a 3D appearance which can be viewed from all angles with little distortion...... If the subject appears to be more than halfway raised from its background, this is classed as high relief. (definition from the Italian Art Studio Pigmentti)
These examples from Pinterest show some of the fabulous Bas Relief effects that can be achieved - low relief and high relief. What a grand and fabulous art form this is - masterpieces found around the world.


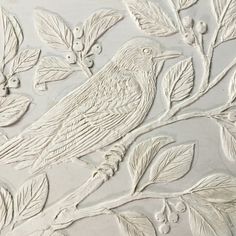
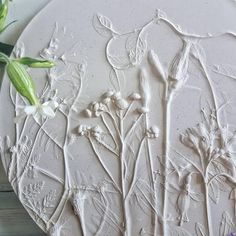

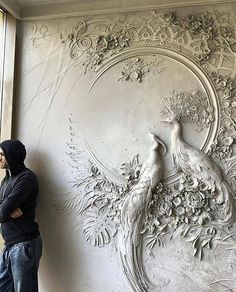

Now - I have to tell you - I would dearly LOVE to be able to actually sculpt - those peacocks and the elephant are just stunning..... but that is not happening anytime in the near future. However, that didn't stop me from working to create a Bas Relief effect using the tools (and skills) I had on hand! I decided to try one of my favorite techniques - some raised stenciling - to see if I could achieve a low relief effect.
I started with some of my favorite "ingredients":

A regular 16x20 canvas

My favorite art plaster. A lot of folks think drywall mud/spackle works just fine for raised stencils but I do much prefer an acrylic plaster. This brand has been my "go-to" for a hundred projects but you can find acrylic plaster at most art and even hardware stores. This particular brand can be tinted, it dries hard enough to sand and doesn't dry out in the container. Also note my trusty 99 cent spatula - also a veteran of at least a hundred projects.
And I used one of the fabulous stencils from WoodUbend/Posh Chalk. These are high quality stencils that are thick enough to be very well suited to plaster/raised stenciling. There are some fabulous designs that you can find on the USA woodUbend website here
I chose a beautiful stencil called "water lillies" which I used a while back to create a valentine heart using the Posh Chalk metallic paste in Violet. Isn't that scrumptious? The stencil is large - almost 20x20 inches and is a repeating stencil (which means you can line it up to do much larger areas). I was ready to go!


The type of plaster I used (see pic above) doesn't require the use of any primer but I didn't want the texture of the canvas to show through at all - I really wanted it to look like carved plaster - so I did a coat of gesso on my canvas and let it dry overnight.
With the stencil placed on the canvas, I used my trusty 99 cent spatula to spread the plaster over the top of the stencil, trying to keep it as smooth as possible.
After the entire stencil is covered with plaster, gently lift the stencil to reveal the raised design.
The excess plaster will need to be scraped/wiped off the stencil right away. The stencils are easily washed in warm soapy water - then just set them out to air dry. The raised design will need to dry - preferably overnight. Waiting is hard.....

Once the plaster is completely dry, any rough areas and the edges of the canvas will need to be sanded. I've found with canvases, it works best to put a large book or piece of wood under the canvas to give you a more sturdy surface to sand on.

Art tools can be used to carve extra details. This is a kit I use for encaustic paintings (paintings with beeswax and resin - that's a whole other blog post lol)

Be sure and remove all of the dust from sanding/carving before you start to paint.

Bas Relief can be done with colors but the effect I was looking for was the carved white plaster with a matte finish. So I decided to use Jolie Paint in Antique White. You can find all of the Jolie Paint products on their amazing website here.
To avoid brush strokes - use a damp brush and brush in all different directions.
And Voila!!! A 16x20 bas relief "carved plaster" canvas - ready to display! Isn't that texture fabulous?

I do plan to use this technique on a wall in my home - I will post when I get it finished!
In the meantime - if you'd like to give it a try yourself - hop on over to the WoodUbend website in the USA for all of the Posh Chalk and WoodUbend supplies. If you're outside of the USA - visit woodubend.com to find your nearest retailer.
I hope you all have enjoyed this project! I am an ambassador and affiliate for WoodUbend, Posh Chalk and Jolie Paint. Please do use the links I've provided in the blog if you decide to buy the products I've described as I do get a small commission if purchases are made through those links. You are also very welcome to come on over and visit my website where you will find original art for viewing in the online art gallery and paintings (and more) available for sale in the online shop. You can also sign up for email alerts (no spam - I promise) but I will keep you posted on new projects, paintings and upcoming events. If you're ever in Edwardsville, IL, you will also find my paintings at the
Good Weather Art Gallery on Main Street.
Thank you for being here!
If you're interested in canvas or framed prints or home decor items with this design - please visit the Fine Art America listing here. Have a great day!!!


Comments