


Staining WoodUbend moldings & appliques....
- Tracy Sayers Trombetta
- Mar 21, 2019
- 5 min read

Hello all! I've been experimenting! And not EVEN with paint - with stain, clear top coats and the fabulous WoodUbend moldings and appliques. One of the members of a facebook group I'm in asked me a few days ago if the woodUbend moldings can be stained to match natural wood. I have LOTS of pictures of painted moldings but I didn't have any pics of stained moldings for her so decided to have a project day. I'm happy to report back that YES - #woodUbend moldings can most definitely be stained to match natural wood! An amazing option for customers and rehabbers that want to add embellishment but not necessarily paint. AND I decided also a great topic for my very FIRST
website blog! (Bear with me - I'll get the hang of it)
If you haven't heard of them yet - let me tell you - they are an upcycler's dream. They are moldings, trims, appliques and embellishments that can be used in art, DIY upcycling, home decor - really wherever you need to add some character to whatever you're working on. I'm proud to say I was the the 1st USA stockists of these delightful pieces and you can see what I have in stock at www.tracysayerstrombetta.com Right - on to the experiments!!
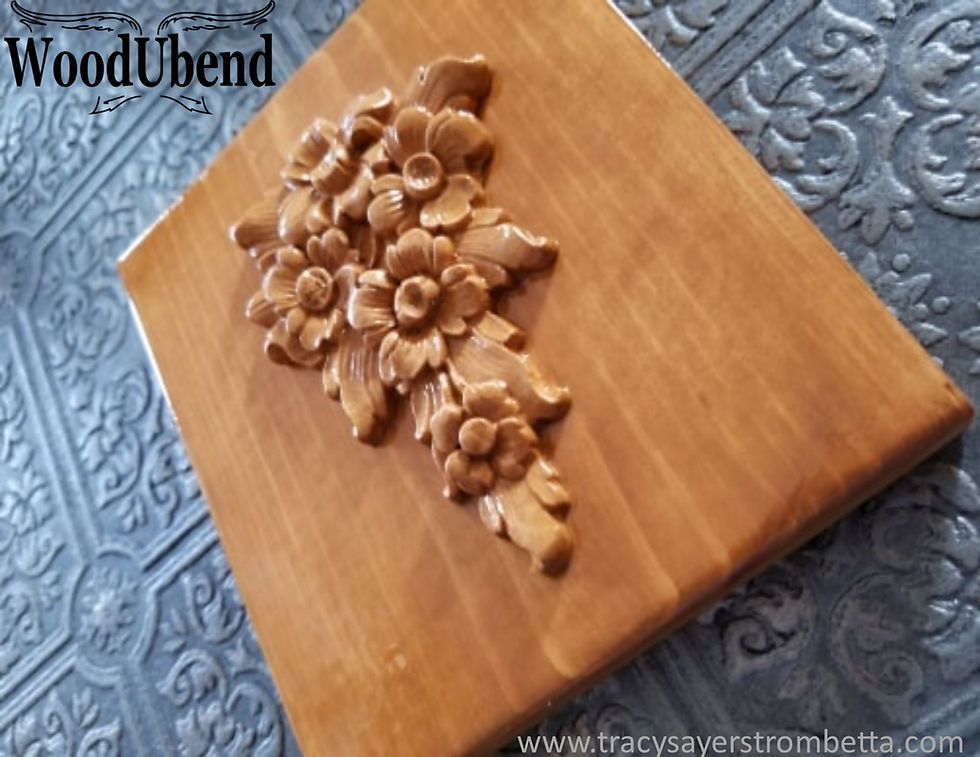
I started out with 3 pieces of scrap wood and 3 of the woodUbend moldings (soon increased to 4 when I found another can of stain in my cupboard) ANYWAY - I chose the appliques below. You can click on each picture to take you to the listing for it on my website. Starting with the floral applique-

One of the angel wings (they come in pairs)

And some of the floral furniture trim (all of the trim rolls come in 82 inch rolls)

And so it began - I dug around behind my paints and came up with some stain. (It's true - I very seldom stain - I'm a painter!!) But I managed to find a variety of stains - water and oil based and different shades to try out.
Minwax Wood Sheen - Minwax oil based - My most favorite gel stain (Stain & Seal) & Minwax express

First step was to attach the moldings to the wood scraps. With all woodUbend moldings - all you need is a good quality wood glue and a hair dryer. Warm up the molding with a hair dryer and it becomes bendable/flexible so that you can mold it to your surface and trim it easily with just a pair of scissors.

Then use a good quality wood glue to attach the molding to the wood. Some tips: #1 If you're going to be staining - don't get messy with the wood glue. You really don't want it oozing out when you press down on the applique. Paint covers wood glue with no problem. #Stain really doesn't. Make sure to wipe off any excess right away.

#2 -Once you have the glue and applique in place- give it a shot with the hairdryer again. I couldn't tell you why but it somehow melds the #woodUbend molding to the wood. You can trim off any excess while it's warm OR you can wait until it's cooled off a bit and sand it. Once the woodUbend #molding is cooled off it acts just like wood and you can easily sand it.
Then it was time to stain! I just used regular paint brushes and followed the instructions on each of the stains - most were apply, leave on a few minutes and wipe off. I decided to go ahead and add a clear top coat to the water based stains just to make sure they were going to finish well and the results were....... Who remembers Meatloaf? (Quick Flashback to my youth) Three out of four ain't bad......
I'll start with the not so great one. The oil based stain didn't work for me. It could have been the particular stain that I had on hand - but it soaked right into the molding while it sat on top of the wood. You can try your own if you want but personally I would say don't waste your time - because the water based stains all worked like champs. Here's the results of the oil based - see how the trim just turned brown? Not my favorite. Now - on to the #goodstuff

The Minwax Express Color in Oak worked perfectly! How adorable is this little plaque? I finished it with a spray clear coat. Just love it!
The second winner was my favorite staining product #fauxeffects stain and seal in antique mahogany. I really do love this water based #gelstain. It's thick and smooth and lovely and you can do a light coat and wipe or heavier coats and let it set for a while for a darker look. Plus I love the dark antique #mahogany. I first ran across this product refinishing a hardwood floor in a 100+ year old house. Fell in love with it. I need to use it more..... Isn't it scrumptious? I used a "triple thick clear coat" spray on this - almost like a resin. And yes - I got a piece of lint on it. I'm a dog mom who doesn't dust unless forced. Even with the bit of lint - Definite winner in my book.

And last but in NO WAY least - because I think it ended up being my favorite piece - the wipe on Wood Sheen. Also in mahogany. Not as dark as my stain and seal but this was just a piece of 2x4! I kid you not. Now look at it! I did have some trouble with this particular stain covering where I had "oozed and wiped" some wood glue. (Refer back to "do not ooze" instructions above) But the way it soaked into the wing molding and brought out the grain of the wood - just makes me smile :) This picture is BEFORE I added a spray clear coat. Scroll on down for the finished product.

Yes - I had a #HarryPotter moment....... . If you're not a Harry Potter fan, I'm sorry - I just couldn't help myself.... It had to be done...... Harry Potter aside - isn't that a lovely finish??

The wood looks carved. I don't think anybody would ever guess this was a wood scrap, would you?

Even though my youngest daughter called dibs - I will be listing this one in the shop - at www.tracysayerstrombetta.com If you haven't visited yet - please do. You'll find my original paintings and supplies that will help you create your own masterpieces - including woodUbend moldings, #Frenchic chalk & mineral paint, #Satlwash texture additive, #decoupage supplies and more!
And so we come to the end of my very first blog. If you've stuck with me until this part - THANK YOU!! I would appreciate any feedback and comments as I'm planning to do this regularly and would like to have a happy bunch of customers and followers. Take care and have a great day!!I
Tracy

Great topic and a great blog. You are clearly being yourself and that's so important. To many blogs are stiffly delivered. I just had my contractor build me window seats in my soon-to-be newest guest room (I run a bed and breakfast) and me thinks I may be embellishing them with this remarkable product. I can't wait to read more of what you do!
I've been blogging for years & can honestly say I would never know this was your first. Great blog, great teaching tool too
Well done xx